- Resizing an image: To resize an image, open the image in Photoshop and go to the "Image" menu, then select "Image Size." In the Image Size dialog box, you can change the dimensions of the image by adjusting the values in the "Width" and "Height" fields. You can also adjust the resolution of the image in the "Resolution" field. When you're done, click "OK" to apply the changes.
- Cropping an image: To crop an image, select the "Crop" tool from the toolbar on the left side of the screen. Use the tool to draw a box around the area of the image you want to keep. Once you have the box in place, you can adjust the size and position of the box as needed. When you're happy with the crop, press Enter to apply the changes.
- Adjusting color and brightness: To adjust the color and brightness of an image, go to the "Image" menu and select "Adjustments." From there, you can choose options like "Brightness/Contrast," "Hue/Saturation," and "Color Balance." Each option will give you a dialog box where you can adjust the settings to your liking.
- Saving your edited image: Once you're done making edits to your image, you can save it by going to the "File" menu and selecting "Save As." In the Save As dialog box, choose the format you want to save the image in (such as JPEG or PNG), give the image a new name if desired, and choose the location where you want to save the file. Then click "Save" to save your edited image.
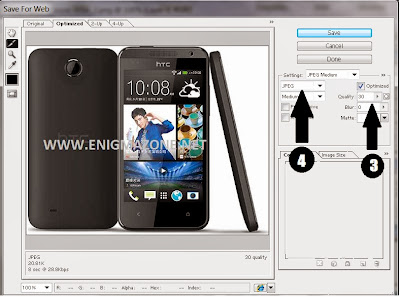
Save Image For Web:
Step By Step:
- Open ‘Adobe Photoshop’, load image through open dialogue box.
- Go to file menu, click on ‘Save for web’
- In the ‘Save for web dialogue box’ change the value given in the setting option such as quality and file type.
- Click on save button.
Rotate Image:
- Go to image menu
- Select ‘rotate canvas’ and click on the desired option.
Change Background (Canvas) Size:
- Go to image menu
- In ‘Canvas size’ dialogue box enter the new value for width and height and in anchor option select the arrow in which direction page size (canvas size) you want to expand.


0 comments:
Post a Comment